成功示例
经过三天奋战,终于拿下了心心念念的MAC代码块,最终的效果就和下面展示的代码框一致
方法很简单,首先修改_config.yml中的代码高亮配置文件到如下样式:
1 2 3 4 5 6 7 8 highlight: enable: true line_number: true tab_replace: ' ' hljs: enable: true style: mac
然后修改_config.butterfly.yml中的代码相关部分到如下样式:
1 2 3 4 5 6 7 8 9 highlight_theme: mac highlight_copy: true highlight_lang: true highlight_shrink: false highlight_height_limit: 230 code_word_wrap: false
探索过程及结果
起初是看到了一个MAC风格的代码块样式,就像是着了魔一样,寻寻觅觅,磕磕绊绊,磨磨唧唧地开始在网上找方法,在这期间,我用了GPT、CSDN找答案,结果都不太理想,于是一度陷入了绝望——为什么我的hexo和别人的不一样!!!到第二天晚上,功夫不负有心人,终于找到了一个HTML的代码式样,欣喜若狂,紧接着就陷入了优化的泥沼,这段时间可苦了我的GPT了,每天接受我长达10小时的拷打哈哈哈。最有竟然以一种万万没想到的方式实现了相应的功能,自惭形秽…
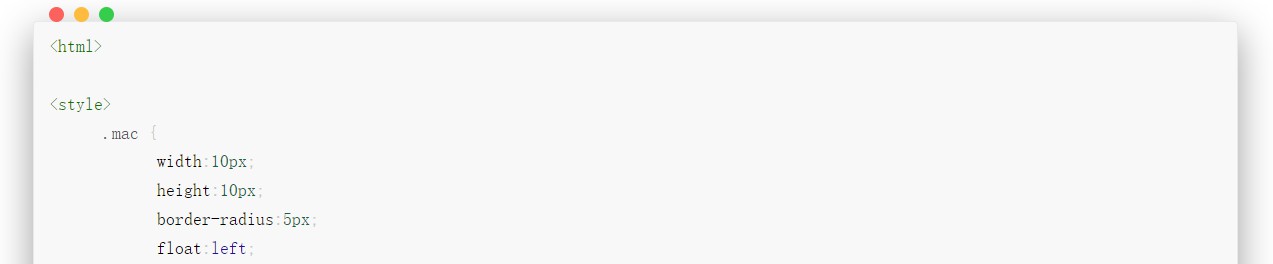
第一阶段成果
这是刚找到HTML代码的时候。这串代码就是MAC上面的三个圆点,可以根据需要灵活调整显示式样。底部是代码块示例。
1 2 3 4 5 6 7 8 9 10 11 12 13 14 15 16 17 18 19 20 21 22 23 24 25 26 27 28 29 30 31 32 33 34 35 36 37 38 <html > <style > .mac { width :10px ; height :10px ; border-radius :5px ; float :left ; margin :10px 0 0 5px ; } .b1 { background :#E0443E ; margin-left : 10px ; } .b2 { background :#DEA123 ; } .b3 { background :#1AAB29 ; } .warpper { background :#121212 ; border-radius :5px ; width :785px ; } </style > <div class ="warpper" > <div class ="mac b1" > </div > <div class ="mac b2" > </div > <div class ="mac b3" > </div > <div > <br > </html > ```css #include<iostream > using namespace std; int main(){ return 0; } // ```
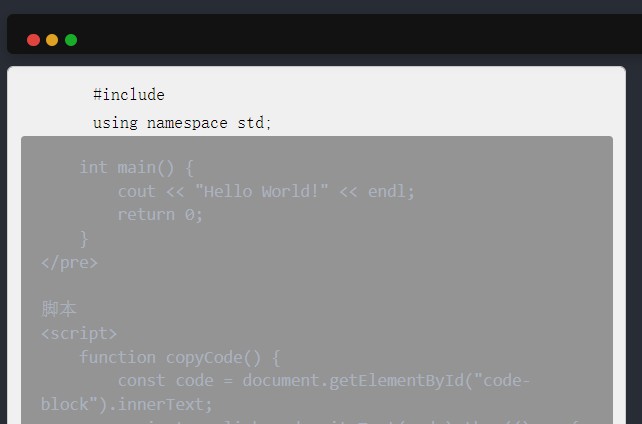
第二阶段成果
这是加了复制按键并调整代码块颜色等式样的结果。这串代码可以转化为内容是我是代码,请随意编辑的MAC代码框,缺点就是经过渲染后会导致网页的重叠,并且代码框里的内容必须是纯文本,否则会出现页面混乱,总之就是,也不太方便。
原始代码如下:
1
2
3
4
5
6
7
8
9
10
11
12
13
14
15
16
17
18
19
20
21
22
23
24
25
26
27
28
29
30
31
32
33
34
35
36
37
38
39
40
41
42
43
44
45
46
47
48
49
50
51
52
53
54
55
56
57
58
59
60
61
62
63
64
65
66
67
68
69
70
71
72
73
74
75
76
77
78
79
80
81
82
83
84
85
86
87
88
89
90
91
92
93
94
95
<!DOCTYPE html > <html > <head > <style > .mac { width : 10px ; height : 10px ; border-radius : 50% ; float : left; margin : 5px 5px 5px 1px ; } .b1 { background : #E0443E ; margin-left : 10px ; } .b2 { background : #DEA123 ; } .b3 { background : #1AAB29 ; } .warpper { background : #121212 ; border-radius : 10px 10px 0 0 ; width : 786px ; position : relative; padding : 6px ; margin : 10px 0 ; box-shadow : 0 4px 10px rgba (0 , 0 , 0 , 0.2 ); } .warpper ::after { content : "" ; display : table; clear : both; } .copy-btn { position : absolute; top : 10px ; right : 10px ; background : #555 ; color : #fff ; border : none; padding : 5px 10px ; border-radius : 3px ; cursor : pointer; } .copy-btn :hover { background : #777 ; } #code-block { background : #f0f0f0 ; color : black; padding : 10px ; border-radius : 5px ; white-space : pre-wrap; border : 1px solid #ccc ; margin-top : 10px ; } </style > </head > <body > <div class ="warpper" > <div class ="mac b1" > </div > <div class ="mac b2" > </div > <div class ="mac b3" > </div > <button class ="copy-btn" onclick ="copyCode()" > Copy</button > </div > <pre id ="code-block" > #include<iostream > using namespace std; int main() { cout << "Hello World!" << endl; return 0; } </pre > 脚本 <script > function copyCode ( const code = document .getElementById ("code-block" ).innerText ; navigator.clipboard .writeText (code).then (() => { alert ("代码已复制到剪贴板!" ); }).catch (err => alert ("复制失败:" + err); }); } </script > </body > </html >
页面元素重叠的情况:这一部分我还没探索出来有效的解决方法,因此这个代码最终也被我弃用了。
反思总结
尽量在原始代码架构上做微调,有不懂的问GPT就行了,人工智能要会用,效率才高!!!
很多看似简单的调整实则牵扯到整个结构的变化,要是没有计算机基础,还是停在基本功能实现层面较好,否则再进哪怕是一点点,都需要大量的时间成本,这个不是每个人都承担得起的。
顺便提一嘴
Typora也有MAC代码框的功能,如图所示,点击图片可以观看教程视频哦~
美观按钮
免费图床